Product Presentation Animation

Hey all!

I am a newbie when it comes to 3D animation, but I wanted to share my very first 3D animation within KeyShot! I will share the final video with post-production and music soon! :slight_smile:

.
.
.
OFFTOPIC
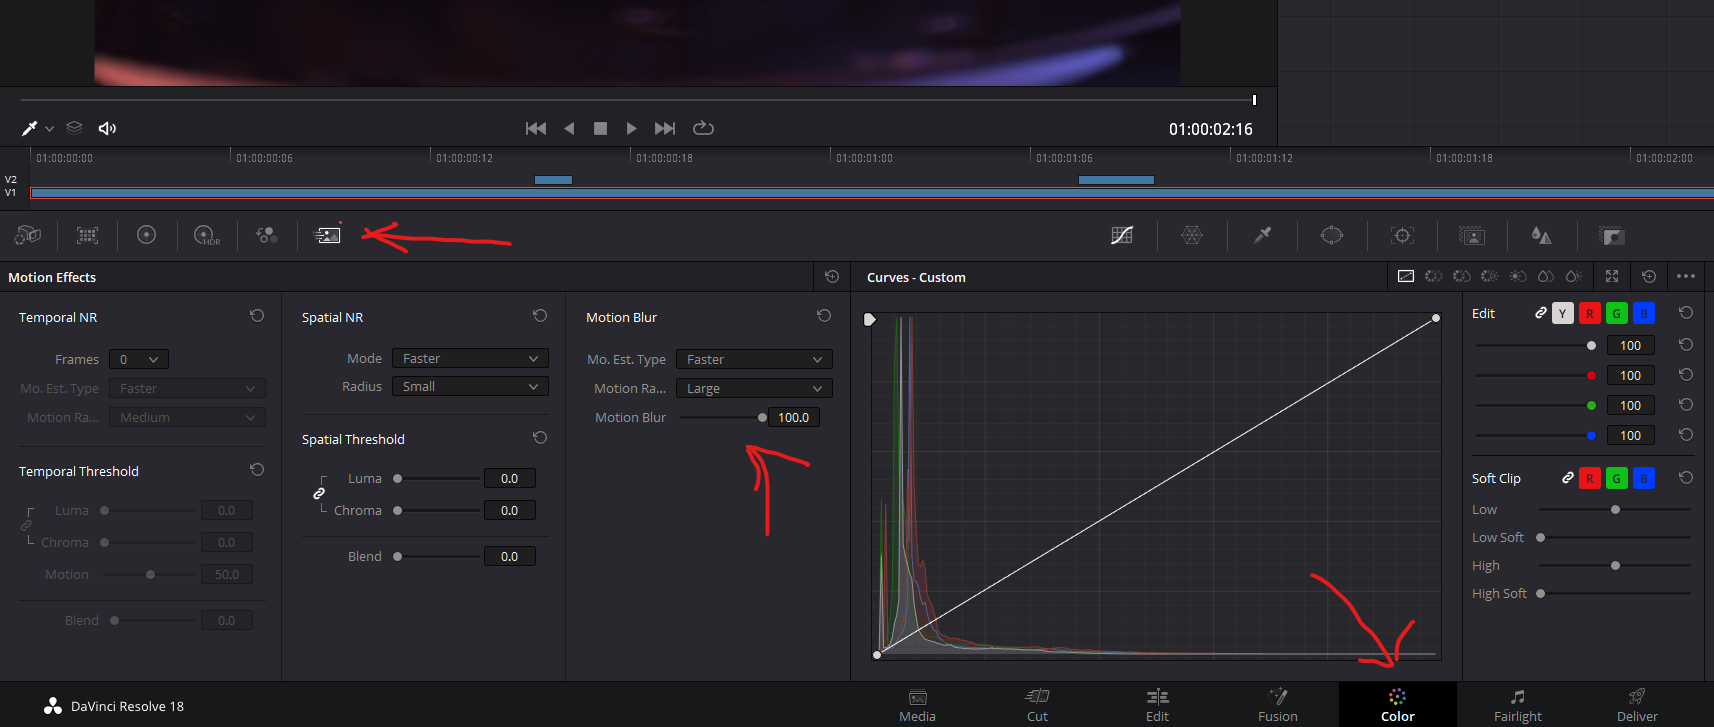
I like the outcome, but there are some things that I am not able to understand like the laggy beginning, some other laggs in the video and the flickering light in the end when looking at the bottom. The animation was set to 30 FPS.
It took ~3 days to render. I would like to know if it is possible to reduce the render time by tweaking my render settings:


The resolution is set to 2K since the material will be used for marketing purposes. Do you think it is overkill or 1080p would be sufficient?

I found that 300 samples was the best sample count for the most intensive render region of the fade effect in the top of the machine.

PC specs:
image

1 Like

For someone describing themselves as a newbie - this is awesome! I’ve shown animation capabilities to hundreds of customers and can say with confidence - you’re ahead of the curve. Material Fades? Stacking camera animations? This looks GREAT.

To answer some of your questions - I think the Heads-Up-Display will be a lifesaver. I tend to use that as a benchmark with the render settings. Just press hotkey ‘H’ to get the display in the upper-right-hand corner of the real-time-view (screenshot attached).

I would suggest scrubbing through the animation output and finding the grainiest frame(s). I am guessing it’s around frame 600-700 - the material fade animation can slow things down a bit. Use the Heads Up Display and let the camera res-up to your preference - and make a not of the ‘Sample’ count in the HUD. Then - just use that for your maximum samples number in the Render output options. This will ensure that the most intensive frames of your animation will render without graininess.

Are you using GPU or CPU for the render? I have a very similar machine with a 3070Ti - I think the GPU mode will render this out much quicker.

For the laggy beginning - The Curve Fade tool will give you much more control. You can ramp up the speed of the initial Camera Dolly. You can find info in our manual here: https://manual.keyshot.com/manual/materials/material-graph/material-graph-nodes/animation-node-types/curve-fade/ and a very helpful webinar here: https://www.youtube.com/watch?v=8EjlRvKOsjU

The flickering lights are most likely from light reflecting off a polished surface. I would add just a little bit of roughness to the interior parts there - the reflections will die down a bit and it should render smoothly.

Let us know how it turns out - and keep at it! You’re an animation natural. I’ve also attached a few comprehensive webinars here that really cover the animation approach from Will Gibbons:

  1. Part Animations: https://www.youtube.com/watch?v=d8m8KPv6bLo
  2. Camera Animations: https://www.youtube.com/watch?v=pTYBCguO5Xs
  3. Advanced Animations: https://www.youtube.com/watch?v=37aas1iBRfY
1 Like

Worked out really well!

I think 300 is quite a high number, like Jordan says, I also use the heads-up display to determine the amount of samples I think are needed.

To cut down on render time you can use denoise which can work pretty well if you don’t have really fine details in your animation. But it can also cause the even background to flicker a bit when the camera is closer. In post that’s pretty easy to deflicker again though.

And what I also do sometimes but that’s really cheating is using Topaz Video AI to upscale the video(frames) or even make it more fps (if I’m short on footage). That’s far from preserving best possible quality but I’m often really surprised about the results.

3 days is still a lot but I see you render on a laptop which will throttle the GPU speed a lot I think on such a render since it doesn’t want to melt. Must say I personally don’t mind a bit of grain into a animation since you won’t really notice it a lot compared to stills. I think it can even feel a bit more natural/movie like.

But it’s a lot of trial and error as I’m finding out as well, every scene is different. In a video of Will Gibbons he also cuts down on render time by doing the motion blur in post. But he renders on CPU and in my current experience I don’t think it really adds a lot of render time compared to renders with CPU, same with Depth of Field. One reason for me to do motion blur in post is that you have more control over the blur.

But really, great work! And you could try to just render a part on 1920x1080 and upscale it in the trial of Topaz Video AI, can save you a lot of time if the result is still nice.

1 Like

@jordan.doane
Thank you for the kind words, this hit me in a nice way! :smiley:
I actually used the Heads-Up-Display, but I thought that it was not too reliable because I cannot set up the same resolution as the one I want to render (I tried to change it in the Image section, but it changes based on what I have opened in the software:
image

As I mentioned in my original post, I rendered one still image using GPU where the material fade is happening, since I thought it will be the most intensive space to render and I found out that the most sufficient sample count is 300 with 2560x160 resolution (took 2 minutes 10 second to render that one frame).
I also tested those:

(per frame)
1920x1200
500 --> home view 35 seconds

2560x1600
500 samples --> home view 1 minute,
500 samples --> inside when lights are on 3 minutes,
500 samples --> top material fade 3 minutes 40 sec
300 samples --> top material fade 2 min 10 sec
300 samples --> inside when lights are on 1:46

Thank you for the materials provided! I will look into them! :slight_smile:

And one more time - I appreciate the lovely words! Means a lot!

@oscar.rottink
Thanks, bud! :slight_smile:
As I mentioned, I did use the H-u-D, but it does not help a lot due to the resolution.
How do I turn on the denoise when rendering? I do know how to enable it when previewing, but how while rendering?
Regarding Topaz Video AI, thanks for that one! Did not know about it. :wink:
Do you mind sharing the video of Will about the cutting down on render time by doing the motion blur in post? :slight_smile:

Thanks again!

For the missing resolution, if you look at the panel with the resolutions there is a ‘edit custom’ there you can just put in your own resolution which you can pick later in the ‘custom’ rollout.

Denoise will be used during render if you have it enabled in the viewport. If you render to .exr files the denoise will only be in the actual image and not in all separate layers if you render those. I mention .exr because that format gives you most flexibility later since those are 32-bit images.

The motion blur is just a function of BlackMagic Davinci Resolve, that’s a free video editor Will Gibbons uses. I’ve never done a lot with video but I like it better than Premiere, feels more logical to me. Basically it has some main buttons like cut - edit - fusion - color - deliver at the bottom.

If you don’t have transparent images this is basically all you need:

The video itself is from Will Gibbons - Animation Masterclass so that’s a commercial product I can’t share Rendering Courses (willgibbons.com)

Since you render on GPU I wouldn’t expect it to be that much faster without motion blur. But sometimes the motion blur is quite heavy so some details can get lost. With DaVinci Resolve you can control it a bit more.

Regarding the Topaz software, if you need to upscale stills the Topaz GigaPixel does also a nice job, way better than for example Photoshop can do. Sometimes it’s good to have a few little tricks for if you run out of time :slight_smile:

1 Like

All great tips above. Here’s one of my own: your selection is blurred out so maybe you did this, but I always render both Video and Frames.

The Video created is simple to work with, but if the render session bombs out for any reason, you can just re-render any Frames that weren’t created, rather than starting the render over from scratch.

Most video editors will easily import numbered still Frames and ‘stitch’ them into a video file.

1 Like

Hmm, sounds good, how about the render time? It is the same, but it just saves those 1600+ frames? I do not really care about the space, since it is business OneDrive. :smile:

Thanks!

It won’t impact render time and I’m not sure which video format you use but if you want to do something in post you can best use AVI uncompressed, that’s a HUGE file but without compression. I would never use the compressed formats from within KeyShot since there’s not much you can change regarding the output quality.

Like Justin says, the nice thing is you can easily just render a range and pick up where you left if you let it output images as well.

I think you can’t export images as .exr and export a video as well. Not sure why actually. PNG and a video will work well. Not sure what video editor you use but if you google for something like ‘program name importing image sequence’ you will see if it’s supported. In Davinci it’s real easy, bit more heavy in the video editor since it’s a huge number of files but you’ve the best quality as starting point.

1 Like